
The Art of Flaky Pie Pastry
%2B(800x533).jpg)
My name is Heather - I'm a magazine stylist and lifestyle producer. I've made pie for more magazines than I can count. Also for restaurants, my own farm gate stand, the Missing Goat cookbook and for television once or twice.
I know pie.
Flaky Crust

This is the 'crust' page where you will find both video and image tutorials below. They both go through step by step instructions to making the perfect crust. I'd suggest watching the video a few times, then following along with the pictures.
Pop back here any time you need for a crust refresher.
You will also see the 'SL' tab above - that's the 'Shopping List' Everything you need - tools and ingredients - in one spot.
Pop back here any time you need for a crust refresher.
You will also see the 'SL' tab above - that's the 'Shopping List' Everything you need - tools and ingredients - in one spot.
Equipment/Tools - What You Need
.jpg)
large open bowl - works far better than a tall narrow bowl
rolling pin - your choice - I've learnt to love this model
a simple glass 9 inch pyrex pie dish - these are the best for baking pies. I've tried fancy ceramic dishes but they didn't bake evenly and my pies were ruined. For 4 dollars you can't go wrong. Be remembered for your pie, not your pie dish.
measuring cups and spoons
fork and a sharp knife
wax or parchment paper
small bowl
*a pastry cutter
%2B(533x800).jpg)
*I'm rather particular about my cutter - the floppy wire version doesn't work as well on really cold butter, and using 2 knives in a pinch is something you'll only want to do once. This is a solid steel model and cuts into hard butter really well. Beware - I have bought some versions that are sharp and can cut your finger when pushing off lumps of butter.
Test it out before buying it.
Ingredients
%2B(800x533).jpg)
2 cups (250 grams) all purpose flour (I've also used 2 cups (254 grams) Bread Flour for pie and it works really well)
1 cup really cold (239 grams) unsalted butter - cubed into pieces roughly 1 inch squares - as seen above. Cube your butter, then keep it in the fridge till you are ready to start.
3/4 teaspoon salt - if you forget to by unsalted butter and only have salted butter - DO NOT add this extra salt
1 large cold egg
3 tablespoons ice cold water
for sprinkling on top:
1-2 tablespoons cream - I've used whip cream, coffee cream and even 2% milk
1-2 tablespoons sugar
%2B(533x800).jpg)
(tuck herbs under the warm pie when you take it out of the oven - it warms them up and the smell fills the air)
watch the video a few times, then follow along with the image tutorials below.
Step by Step Images to Making Crust
I've used my 6 year old daughter as my assistant. She is not only a fabulous hand model, but she makes great pie - if she doesn't eat all the apples first.
%2B(800x533).jpg)
Making Crust
I'm sure you have heard this a million times, but everything must be COLD. Cold is the key. Having cold lumps of butter in the dough is what makes the pasty flaky - this is why over working your dough ruins the crust and it looks flat. When the heat of the oven hits your cold butter, it's pops it open - flakes appear!
So, get everything ready and keep your butter and ice water in the fridge till you need them.

step one - cube your butter. i cut the my butter (which is a square in Canada) into three pieces, turn and cut again into three, then onto it's side and cut into three once more. It looks like a rubix cube.
%2B(800x533).jpg)
add in your flour and sprinkle over the salt
%2B(800x529).jpg)
use your pastry cutter to cut through the butter. just keep pushing it down on the lumps of butter. they will break down and get smaller. you will need to use your fingers to push globs of butter off the cutter now and then. keep cutting till they are random 'pea size' bits.
%2B(800x533).jpg)
this is exactly how it should look - the butter has been chopped up into small bits - about the size of peas - some bigger, some smaller. it is clearly not blended or evenly chopped.
it's perfect! stop chopping.
%2B(800x533).jpg)
crack an egg into a small bowl and whisk with a fork.
add 3 tablespoons of ice cold water to your beaten egg.
whisk together with the fork.
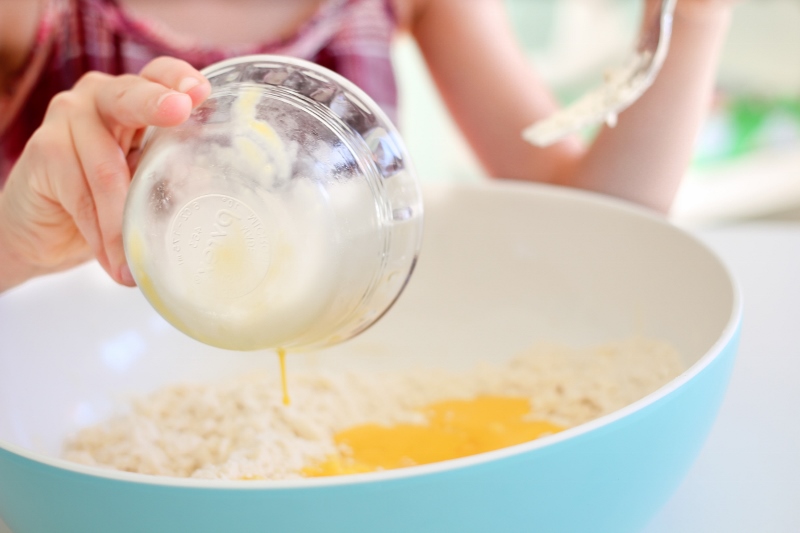%2B(800x533).jpg)
pour egg/water mix into the centre of the bowl.
use the fork to quickly mix the flour and butter with the egg and water. you will come to a point where you can't blend it any more - it is still very lumpy, dry and no where near mixed - this is good.
%2B(800x533).jpg)
at this point, you are going to switch to your hands. the best way to describe this is to say - grab the mix in each hand, squeeze it together, and then flip it upside down. there is usually a lot of loose flour on the bottom, and you want to squeeze the buttery bits into this.
by flipping handfuls of dough upside down, the flour is pulled to the top and gets worked in. keep grabbing the dough and squeezing - it will begin to bind and become lumpy looking.
this needs to be done quickly so the butter stays cold.
the best way to ruin a pie, is to over work the dough and try to blend it together into a smooth ball.
%2B(800x533).jpg)
this is how it looks when it is done being worked.
it is clearly not mixed or in a soft smooth ball.
there should be lots of little clumps that are not worked in and fall even fall off.
it should be lumpy and look like it is falling apart.
%2B(800x533).jpg)
divide into two clumps - one can be slightly larger as this is the bottom of the pie and needs to be a bit bigger than the top layer.
%2B(800x533).jpg)
grab your wax paper or parchment paper and tear off one piece - about 20 inches long.
I use the paper for a few reasons - I don't end up with such a big sticky counter mess, I can use far less flour to prevent it from sticking to the counter and tough, and it's just so easy to flip it into your pie plate with the paper.
%2B(800x533).jpg)
lightly flour the top of the paper - this helps if it's a warm day or the kitchen is hot and the butter is getting soft. You can always pop the dough in the fridge to cool if you feel it looks warm and melted. if it is melted, and can stick to the paper and not peel off nicely.
*tip - if the dough is not coming off the paper as the butter got to warm, scrape it all off, wrap in plastic wrap and chill it in the fridge - try again to roll it out once it's cooled down
%2B(800x533).jpg)
put the bigger pile on the wax paper
%2B(800x533).jpg)
give it a light press - once or twice to flatten it out slightly
sprinkle a bit of flour on top of the dough
%2B(800x533).jpg)
add a bit of flour to your rolling pin
%2B(800x533).jpg)
roll. i work from the middle out to the edges forming a circle. i often turn the parchment paper to work it from different angles. if it pulls apart or tears, simply grab a piece from the side and do some patch work. remember - this is the bottom so it won't be seen.
keep rolling till it's evenly thinned out and will stretch across the width of the pie plate. thinner is better than thick.
this image above is the perfect thickness.
*tip - if you find the parchment or wax paper is slipping around, angle the paper so a small corner hangs over the side of the counter. Press your hip and belly against the paper to hold it in place while you roll. if you put a small wipe of water on the counter underneath the paper, this will also hold it in place better.
%2B(800x533).jpg)

%2B(800x533).jpg)
you can now begin to slowly pull the paper off the dough.
%2B(800x533).jpg)
if it sticks, use your fingers to gently work it away from the paper.
%2B(800x533).jpg)
once the paper is off, you may need to slightly adjust the dough over the plate. press it down gently to fit inside the pie plate. sometimes there can be a hole or not enough dough on one side. this is where you can pull some of the excess from another area and patch up it up. just tear a piece from one spot that is hanging over the edge and press it in where needed.
remember, this is the bottom - so patchwork is not going to be seen.
%2B(800x533).jpg)
use a sharp knife to trim away the excess.
at this point, you can pop it in the fridge while you make filling. wrap up the remaining dough in plastic wrap and place in fridge too.
*tip - if the filling is hot, let it cool before pouring it in. It will melt the dough and make it gummy.
if your filling is ready, pour it in, then proceed.
*tip - if the filling is hot, let it cool before pouring it in. It will melt the dough and make it gummy.
if your filling is ready, pour it in, then proceed.
Your filling is in...
%2B(800x533).jpg) repeat the rolling of the dough with the second clump. Place your filled pie plate in front of you with the dough behind it
repeat the rolling of the dough with the second clump. Place your filled pie plate in front of you with the dough behind it
%2B(800x533).jpg)
flip the dough over onto your pie. you want to make sure your placement is good this time, and it is difficult to shift the dough once it connects with the filling.
gently pull away the paper, prying it away with your fingers if it sticks in spots.
%2B(800x533).jpg)

i press the dough down gently around the outside of the filling. pinch up the edges a bit, lightly combining the top and bottom layers, then trim off the excess dough.

%252B(800x533).jpg&container=blogger&gadget=a&rewriteMime=image%2F*)
cut two slits in top to allow the steam to escape and then finish pinching your edges together.
you can be as fancy as you like. i tend to be rather rustic about it - but that is my choice. make it your pie and find the edge that makes you smile.
.jpg)
this is one of my little secrets that I learnt from my mother in law.
take a bit of cream and brush it on top of the dough. use your fingers or a pastry brush to move it around a bit, covering the top in a random way - no need to be perfect and cover every single spot - please note, by daughter got a bit carried away
%2B(800x533).jpg)
sprinkle sugar over the top of the pie - about 1-2 tablespoon - this is your choice about how much sugar to have on top. you can add more or less.
%2B(800x533).jpg)
holy cow, you made a pie!
place in your 425 f (220 c) oven for 13 minutes.
after 13 minutes, reduce the heat to 350 f (180 c) and bake another 25-30 minutes.
all ovens seem a bit different. mine is gas, so these times work perfectly for me.
don't adjust the 13 minutes at 425, but you may find you need a few extra minutes at 350 to get the lovely slightly golden brown crust.
Can I Bake it Later...YES
*tip - if you aren't going to bake the pie now, and plan to keep it in the fridge for later, do not add the sugar and cream. add cream and sugar just before baking. lightly wrap the pie in plastic wrap and place in the fridge. it can be baked later that day, or the next.
The Perfect Moment to Serve Pie
is exactly 2 hours after it has come out of the oven.
it has cooled enough to set your filling, but is still warm and utterly delicious.
Troubleshooting...
%2B(800x533).jpg) problem: oh no, my crust has a tear in the top layer - it's not perfect
problem: oh no, my crust has a tear in the top layer - it's not perfect
solution: if you have flaky delicious pastry, absolutely no is going to care. it adds to the charm of being home-made - strive for perfection in the taste of the crust, not the looks. i still get tears (like above) but sometimes the juices come through that spot and make it the coveted piece everyone wants.
problem: oh no, my dough is flat and not flaky- what happened?
solution: flat pastry comes from being to warm when you made it and over working. if it's a really warm day, making cold crust can be tough as the butter melts. i made pie with a friend who had incredibly warm hands. while that's a nice hand to hold on to, it's not good for working pastry dough. try to keep everything as cold as possible - including yourself
problem: oh no, my crust top lifted up when baking!
solution: don't worry, it will drop back down and settle as it cools. it can happen - but that just means your pastry really popped! good job!
be sure to pinch your two layers of dough together around the edges before baking to help keep them together.
problem: my pies are so good, everyone wants me to make them all the time
solution: ...sorry there is none. it happens.